Backup Hardware Driver | Windows Tips


Hello thecybergal readers, how are you today? Almost a week thecybergal has no any idea to be posted. After the last post, which told you how to find the correct hardware driver, I think it’s relevant to give you simple tips to Backup Your Hardware Driver. To backup hardware driver, thecybergal uses WinDriver Ghost 3.0.

We can use WinDriver Ghost to backup our hardware driver well. One thing you must focus is you have installed the current drivers correctly, because these drivers will affect to success or bad the result of "ghost" we did ^_-.
WinDriver Ghost run well on Windows XP, but about other version I’ve never tried it :D. To download just click WinDriver Ghost here. After you fill the username and password, then you will see a display like this.

WinDriver Ghost steps

To make some backup, follow the instructions bellow:
  1. Run WinDriver Ghost, click on Fast Collect. This process will collects drivers installed on your computer.
  2. When it finished, click Make All. The new window appears ask you to define location where you will put the backup. I suggest you to save your backup outside of System Drive (usually C:\).
  3. After you deal with the location, just click the OK button in the next window. Do not press any key on WinDriver Ghost during the process runs.
  4. If you carefully look at the picture above, some of the steps to backup your hardware driver already exist there.
  5. Finish.
Make sure the location where you save the backup is safe. That’s all about backup hardware driver, hope you get something useful here. If you want to check the complete listing of downloadable tools, just click the Download Tools page. Cheer!

Windows Tip: How to Find the Correct Driver


At this post, thecybergal will try to discuss how to find the correct driver from the device in our Windows OS computer. Driver is a high level programming language used to communicate with hardware devices.
When there is a device that did not have the correct drivers installed, the device will not be able to work maximum, even can’t work at all. To determine whether the device from our Windows computers has the proper drivers installed, you can open the Device Management by typing "devmgmt.msc" in the Run box from our Windows OS.

If there is a device that did not have the correct drivers installed, you will see an exclamation sign in front of the device name. To find the correct drivers, you can perform the following steps:
  1. Highlight the device that has no correct driver installed. Double click on the device so you will see the Properties box.
  2. Go to Details tab. In the drop down menu that appears select "Device Instance Id" (This is the default option).
  3. Copy (Ctrl + C) the information in the box under "Device Instance Id".
  4. Go to http://www.devid.info/en/.
  5. Paste (Ctrl + V) the copied information.
  6. Download the driver in accordance with Windows OS on your computer.
That’s all the Windows tips from thecybergal. Hopefully the above Windows tips can be useful for you. Thecybergal also says thank to devid.info which had provide a bank of hardware driver: D. The method to find the correct driver mentioned above work on Windows XP, Windows Vista, also Windows 7. See you in the next post.

Windows Tips; How To Hide Your Local Drives


Hello thecybergal readers, on this post thecybergal wanna share you simply Windows tips to hide your local drive. Although this tips quite simple, but I thought it would help you to at least secure your data in the selected drive from unauthorized user (just from newbie user of course :D).
Ok, let’s get it done by following these steps:
  1. Open Registry (Start > Run > type "regedit" > [press the enter button]).
  2. Before you make any changes to your Windows registry, make sure you have back it up. (File > Export) and give any names.
  3. Go to HKEY_CURRENT_USER\Software\Microsoft\windows\CurrentVersion\Policies\Explorer
  4. Modify or make new DWORD Value named "NoDrives".
  5. For the Value, use method bellow (2^n):
    n = 0 : Drive A = 2^0 => 1
    n = 1 : Drive B = 2^1 => 2
    n = 2 : Drive C = 2^2 => 4
    n = 3 : Drive D = 2^3 => 8
If you want to hide drive C, then the value of NoDrives = 4. If you want to hide drive D, then the value of NoDrives = 8. But if you want to hide drive C and D, then the value of NoDrives should 4 + 8 = 12. Hope you understood ^_^.

That’s all Windows tips today, hope you can get a bit of Windows science. See you in the next thecybergal's Windows tips.

Yups, this is the screen shoot:
hidden computer drive
Hidden computer drive pic

Excel Password Remover | Ms. Office Tips


In this post thecybergal will discuss how to open the protected sheet or workbook on Microsoft Excel. If you intend to finish your excel job, but a warning message appears tell you that the cell or table where you will write your job is protected I think this post is suitable for you, IMHO
Excel Protected Sheet

Actually open the protected sheet in Microsoft Excel can be done in various ways. One of them is Advanced Password Recovery Office. But if you don’t want to install any new programs on your computer, then this trick will probably be the right option. I am using Excel Password Remover program from straxx.com. Just click > Excel Password Remover to download and use it for free.

For the complete download list, go to Download Tools.

After you download Excel Password Remover, then extract the file and you will find a file called password.xla. What you should to do is copy the file (password.xla) into C:\Program Files\Microsoft Office\OFFICE11\add-ins. Open your excel file (the protected excel) > Click on the Tools > Unprotect Sheet (if you want to open protected sheet) or Unprotect Workbook (if you want to open a protected workbook)

If the first method above didn’t worked, then you can try the second method. Let’s say it as Plan B :D
  1. Open Microsoft Excel > Tools > Add Ins
  2. Click on Browse > Find the location where the recent downloaded add ins located (password.xla) and click OK
  3. Open the protected excel file.
  4. Select Unprotect Sheet or Unprotect Workbook (Depends on what will you like to open).
This trick doesn't work to Microsoft Excel 2007 but it works fine on Excel 5.0 and above (including Excel 2000, XP and 2003). If you need to Unprotect Microsoft Excel 2007 Sheet or Workbook, please give your feedback to thecybergal. I will try to looking for some answers :D

Make USB Windows Installer with WinSetupFromUSB | Windows OS Tips.


Hello thecybergal readers. Making the Windows installer with USB stick media not as difficult as what we thought. This process is quite challenging, and in the end when you successfully about that, then the sense of satisfaction will be found. In this article, I recommend you using WinSetupFromUSB to make Installer Windows OS from USB stick.

WinSetupFromUSB is quite simple with a good success rate. OK, without a lot of speaking, if you want to create a Windows Installer from USB stick, please click WinSetupFromUSB to download the software. To get complete downloadable softwares, click download tools here. After the software downloaded, then follow these instructions bellow:
  1. Install WinSetupFromUSB into your Windows OS. (XP, Vista, 7).
  2. Prepare your USB stick as the Windows installation media. Make sure you've made backups of the contents of your USB stick, because this process will format your USB stick.
  3. Create a folder to store the Windows Installer file (e. g. D:\WinXP). Copy all files from the Installation Disk into the folder (D:\WinXP).
  4. Run WinSetupFromUSB while your USB stick mounted.
  5. Select the Installation Source (D:\WinXP).
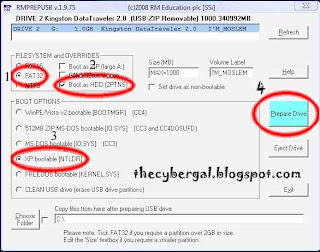
  6. Format your USB stick by pressing RMPrepUSB button. To the better performance, select FAT16 if your USB Disk is less than or equal to 2 GB, and select FAT32 if your USB Disk is more than or equal to 4GB.
  7. Checkmark on Boot as HDD (2PTNS), and under Boot Options adjust to the which Windows loader will be installed. If you want to make a Bootable USB XP Installer, select XP Bootable (NTLDR).
  8. After all configurations finished, click on Prepare Drive.
    winsetupfromusb settings
  9. Copy all files from folder we created (D:\WinXP) by pressing Go button, if you see License Agreement window, just go ahead and click Agree.
  10. Change your Boot Sequence to USB stick. This installation steps have two parts. You have to select First Part until the computer restarted, and again boot from your USB stick and select the Second Part when the initial setup screen appear.

NB. When you think to install Windows XP on Built Up PC or Netbook like HP Mini 110-1100 Tord you must slipstream the SATA driver to prevent from BSoD during installation process. Again, why I use WinSetupFromUSB because when I used other method I always get the Error Message which tell me about "INF file txtsetup.sif is missing or corrupt, status 18". Since I found WinSetupFromUSB this problem can be healed successfully.

Ok, that's all Windows OS tips today. I hope you can get some advantages from my short passage and you'll be right back here (to looking for pretty tips of course)... See you in the next thecybergal tutorial...

Win XP as A Simple Router | Network Computer Tips


Hello blogger holic, after I told you a security tips about securing your computer from offline viruses using USB Disk Security, now thecybergal will tell you a method to make your Windows XP as a simple router. As we known, router used us to make some connections among two or more different network.

We usually use Pure Router "to bridging" different network connections. There is a wide variety of Pure Router which we can use as a router in our network like MikroTik, IPCop, PfSense, Ubuntu Server and so on. But in this passage, we will discuss about XP Router.
So, does Windows XP can work like a Pure Router? Yes, of course it can although there are many features that can be handled by XP Router. Let’s get it done.

xp router, thecybergal.blogspot.com
xp router topology | thecybergal.blogspot.com
From the picture above, the Internet network (Red) has the IP segment 192.168.1.X, HotSpot Network (Blue) has the IP segment 192.168.20.X and LAN (Green) has IP segment 10.10.10.X. With topology as above, then XP Router requires at least three NICs, namely for the network of Red, Green, and Blue.

The following are IP settings for the third NIC on the "PC XP Router":
NIC for Green connection:
  • IP: 10.10.10.1
  • Netmask: 255.255.255.0
  • Gateway (GW): [left it blank]
NIC for Blue connection:
  • IP: 192.168.20.1
  • Netmask: 255.255.255.0
  • Gateway (GW): [left it blank]
NIC for Red connection >> IP settings depends on the ISP where we rented bandwidth (static or dynamic). We assume that we use static IP address:
  • IP: 192.168.1.5
  • Netmask: 255.255.255.0
  • Gateway (GW): 192.168.1.1 (IP from our ADSL Modem)
All of three different networks above must have different IP segments/should not be the same between Red, Green, and Blue.

IP configuration of each computer (under XP Router).
Green
  • IP: 10.10.10.2-224
  • Netmask: 255.255.255.0
  • Gateway (GW): 10.10.10.1 (This gateway leads to the Green NIC XP Router)
Blue
  • IP: 168.20.2-254
  • Netmask: 255.255.255.0
  • Gateway (GW): 192.168.20.1 (This gateway leads to the Green NIC XP Router)
When you finished, let’s play with your XP Router.
  1. Go to Regedit.
  2. HKEY_LOCAL_MACHINE\SYSTEM\CurrentControlSet\Services\Tcpip\Parameters
    Change the value of IPEnableRouter Right-click > Modify > Value Data change the value to be 1.
  3. Close the Registry Editor, and restart your XP Router. Now, all of your Network PC can be connected to the Internet. Pay attention to restart your XP Router before it can be worked properly.
OK guys that are all XP Router for you. I hope it can be useful when you have no any Pure PC Router as an alternative method for you to stay connected. See you on the next thecybergal tips.

Adapted from: http://www.home-network-help.com/

Windows Security; USB Disk Security, Protect from Offline Virus


Hello guys, I wanna share to you about security tool. This is quite simple but strong tool. USB Disk Security, the tool called. It has publicized by Zbshareware Lab to protect the spread of the flash disk viruses.
It has 7 main windows. Unlike antivirus programs which generally takes a lot of memory, USB Disk Security just uses about 2,152 K of your RAM.

USB Disk Security, thecybergal.blogspot.com

If there is an autorun file in flash disk, "USB Disk Security" gives you a warning and you can decide what steps you would take on the autorun file. Again, it’s very different from some antivirus programs which frequently encountered where some of them simply delete autorun file.

We knew that not all autorun programs were bad. Here’s a bit screenshot of the USB Disk Security when it found an autorun file from a flash disk.

USB Disk Security, thecybergal.blogspot.com

Actually, this post is enchantment from this post USB FlashDisk Security.
Just click here to download and enjoy it.

For the complete download page, go to Download Tools Page here.
See you in the next Windows security tips.

Windows Tips; What cndrive.exe Is?


Hello everybody, very long times thecybergal has no ideas to post something useful for you. Now, I will try to give some information about something like Trojan which called cndrive.exe. The name of cndrive.exe is given by SmadAv antivirus. It did bad things like cutting your internet connection. Here’s the simple descriptions about cndrive.exe:

  1. Category: backdoor Trojan, network aware worm.
  2. Process name: cndrive32.exe.
  3. File location: %systemroot%\cndrive32.exe.
  4. Size: 339,968 bytes.
  5. Registry Activity:
  6. *[HKEY_LOCAL_MACHINE\SOFTWARE\Microsoft\Windows\CurrentVersion\policies\Explorer\Run] > Microsoft Driver Setup = "%Windir%\cndrive32.exe". *[HKEY_LOCAL_MACHINE\SOFTWARE\Microsoft\Windows\CurrentVersion\Run] > Microsoft Driver Setup = "%Windir%\cndrive32.exe".
That’s all brief descriptions about cndrive32.exe. If your AntiVirus program can easily remove the Trojan, I think you got some good protection. But if you felt disturbed about this Trojan and your AntiVirus seems not good, you may manually block this Trojan process. Do these steps:
  1. Run, and type "gpedit.msc". Go to User Configuration > Administrative Templates > System and double click Don’t run specified Windows applications.
  2. Set to Enabled, click Show button next to List of disallowed applications. Click Add button and enter the name (cndrive32.exe).

    cndrive32_picture taken from http://thecybergal.blogspot.com/2010/07/windows-tips-what-cndriveexe-is.html
    cndrive32.exe by thecybergal
  3. If there are other programs that you suspect, just enter the name of the program such as the steps above.
Ok, buddy. That’s all a bit of Windows tips today. I hope you get something useful by reading thecybergal. See you on the next Windows tips. Not only cndrive32.exe of course.

Adapted from the letter of:
  1. Ahmad Syahruddin (asm2000@yahoo.com)
  2. Motta Gare (mottagare@yahoo.com)

Computer Tricks; How To Make Portable Application


Hello everybody, how interest your weekend are? I hope everything is going OK. This Sunday, thecybergal will tell you a Windows trick to make some portable applications. Some advantages of using portable applications like; you can run your application smoothly without any installation on your Windows computer and although when you had no an Administration user you will not probably thinking something about Administrator cracker programs.

We will talk 2 programs now. The first is Thinstall and the other is Virtual PC. Thinstall is used to make the portable application and Virtual PC is used to install the program we made. Why should you use Virtual PC? Of course, if you had other clean PC you didn’t need Virtual PC anymore and I was sure that you had not.

First time you have to do is installing Virtual PC into your real PC. I used Windows XP as OS in my Virtual PC and install the Thinstall into the real PC. Make sure you activated the Undo Disk feature on your VPC settings which it will keep your VPC is absolutely clean when you close (not Shut Down) your VPC. I mean anything job you done would be discarded if you activated Undo Disk feature.

Give your VPC an IP address, e.g. 192.168.0.2 and real PC (will be called as RPC) 192.168.0.1. Start your Thinstall (in the RPC) from your VPC by accessing the appropriate Thinstall folder. You must share your Thinstall folder first and give the Full Control to the other computer (your VPC machine). For an example, you can Run and type \\192.168.0.1 (without quotes) in your VPC. This makes a way to access your Thinstall.exe program.

Once you accessed your Thinstall.exe you just have to press Start button (Thinstall’s button) and select the proper Registry hives. Click on Pre-Install Scan and you can take a rest while Thinstall capture your "fresh" VPC’s registry. When Capture process finished, you should install the program which will be made as portable apps. Don’t forget to insert the registration or anything key until your Installed Apps working correctly. And the last job is press the Post Install button in the Thinstall’s wizard. When you noticed that Setup capture is complete all you have to do is double-clicking the build.bat in the Thinstalled app's folder. The new-portable app's.exe is located it the folder bin. You can run the Thinstalled apps wherever you login and whatever your Account types.

See the pictures bellow and I think you can understand what I mean is. Click the pictures for detail view.

Ok, that's all Windows tips from thecybergal. I hope it will be useful for you. Give your feedback for a better next post.

Computer Tips; Repair Hang on Start UP (Windows Logo)


Hello, meet you again on the last Friday this month. Today, thecybergal shares you tips how to repair Windows hangs when Windows logo appears. This article was taken from my experience.

So my computer cannot get into Windows but stops when the Windows logo appears. To fix it, we can improve through the Repair Console. Booting the computer with the Windows XP CD and press R at the time of the first dialog appears.
Do these Windows trick bellow:
  1. Type the Administrator password to get into Windows directory.
  2. Make a temporary directory to save all configurations, "md thecybergal" (without quotes).
  3. Copy all configuration files, actually there are five configuration files: software, system, sam, security, and default to the temporary directory we created. Type the syntax bellow followed by enter button.
    • copy c:\windows\system32\config\system c:\windows\thecybergal\software
    • copy c:\windows\system32\config\software c:\windows\thecybergal\system
    • copy c:\windows\system32\config\sam c:\windows\thecybergal\sam
    • copy c:\windows\system32\config\security c:\windows\thecybergal\security
    • copy c:\windows\system32\config\default c:\windows\thecybergal\default
  4. Delete the old configuration files,
    • delete c:\windows\system32\config\software
    • delete c:\windows\system32\config\system
    • delete c:\windows\system32\config\sam
    • delete c:\windows\system32\config\security
    • delete c:\windows\system32\config\default
  5. Copy the new configuration files which will replace the deleted files.
    • copy c:\windows\repair\system c:\windows\system32\config\software
    • copy c:\windows\repair\software c:\windows\system32\config\system
    • copy c:\windows\repair\sam c:\windows\system32\config\sam
    • copy c:\windows\repair\security c:\windows\system32\config\security
    • copy c:\windows\repair\default c:\windows\system32\config\default
If you feel the Windows tips mentioned above quite confusing, you can use the LiveCD to fix it. This method may be more familiar because you just have to copy-paste like your Windows habitual. I usually use miniPE to do something with LiveCD

OK, that's all Windows tips today. I hope it will be useful for you.
Adopted from Microsoft Support

Computer Trick; Uninstall MagicDisc


Have you known MagicDisc? MagicDisc is a freeware program which allow you to mount your ISO files, so you can view the final result before you decide to burn your ISO. Generally this program is better if we combine it with the MagicIso (shareware program). MagicIso is a burning tool which has small in size. We can burn many ISO files like *.nrg, *.uif, *.iso, and the most today’s ISO format.

Although MagicDisc has a powerful function, but it has a bug instead. We had met some difficulties when we tried to uninstall it. In the initial uninstall progress, it seen like a normal process, but the progress bar suddenly stopped for unclear reason. I have tried to uninstall MagicDisc in many times, and the result is same, the uninstall progress bar stopped.

I looked for the answer to Google and found some answers. The most effective trick is as described bellow:
  1. Boot into Safe Mode Windows by pressing F8 just when the black screen appears before Windows loaded.
  2. Type in the Run box "%systemroot%\system32\drivers".
  3. Delete mcdbus.sys (this is the MagicDisc SCSI Host Controller) which is what’s causing all these problems.
  4. Reboot and start Windows normally then uninstall it.
That’s all our Windows Trick today, hope will be usefull for you. I got this trick from sevenforums.com. Say thanks to beatsme.

Windows Tips; How to Disable Autorun


Windows has a feature called Autorun. Autorun is a program like autoplay. Microsoft Windows has launched it since Windows 95 generation. Generally, autorun was found in a program to make easier in the installation step.

We often meet the autorun program on the hardware driver disk. Using autorun, we don’t need to look for the setup application to install the correct driver.

Autorun looked so friendly now, but sometimes autorun can make us have a bit of peevish. That happens when several viruses spread himself using autorun. So, I think is a good idea if we turn off the autorun feature. We still can run the hardware driver installation from the setup.exe file.

So, how to disable autorun programs, do these steps:
  1. Press Win Key + R and type "gpedit.msc"
  2. Under Computer Configuration double click Administrative Templates
  3. Go to the System, and double click Turn off Autoplay
  4. In the Turn Off Autoplay Properties window, select Enabled. From the dropdown next to Turn Off Autoplay on, select All drives and then click OK. Exit Group Policy by selecting File, then choosing Exit from the menu.

That’s all our windows tips today. If you have some questions, just give us your feedback and we will try to help you...

Various Ways to Make The Program Started Up Automatically


Hello, meet you again with some Windows Tips. Now, I'll share you some computer tips about making auto run a program. We decide it into two parts.
From the registry, we have four Windows tricks:
  1. HKEY_LOCAL_MACHINE\Software\Microsoft\Windows\CurrentVersion\Run. Values defined under this key cause tasks to run for every users that logs on to the systems.
  2. HKEY_CURRENT_USER\Software\Microsoft\Windows\CurrentVersion\RuValues defined under this key cause tasks to run for every user that logs on to the system.
  3. HKEY_LOCAL_MACHINE\Software\Microsoft\Windows\CurrentVersion\RunOnce. Values defined under this key cause a task to run the next time any user logs on to the system (and not after that).
  4. HKEY_CURRENT_USER\Software\Microsoft\Windows\CurrentVersion\RunOnce. Values defined under this key cause a task to run the next time the current user logs on to the system.
From the Startup Folders
  1. Programs placed in the following folder are run after any user logs on to the system: %ALLUSERSPROFILE%\Start Menu\Programs\Startup
  2. Programs placed in this folder are run for a specific user: %USERPROFILE%\Start Menu\Programs\Startup
That's all our Windows tricks today, hope you get some useful thing from what I posted today.
Adopted from Windows Server Cookbook @Team LiB. Say thank to them.

Security Tips; The Reasons Why Should Use Normal User


Log on using WIndows Administrator privilege is more efficient when you need to install or uninstall software. You don’t have to enter some password when you did. Administrator has no any restriction about computer system. That’s why some of the effects of the virus freely working when infect users who login using Administrator privilege.

A best practice system administrators should follow is to log on using a normal user account that has no administrator level privileges other than on that system. The Windows administrator should be log on using administrator privilege when the systems have to do using administrator privilege only. This has three distinct advantages:
  1. It reduces the impact a virus can have on your network if your machine becomes infected.
  2. It reduces the chance of accidentally deleting important files and folders or making administrative changes unknowingly.
  3. It ensures the network remains secure even if someone gains physical access to your workstation while you are logged in.
Since Windows 2000 and the earlier OS have the Run As feature, you didn’t need to logon using Administrator privilege when you have some administrator job. Just press the Shift button and right click the program you want to run and select Run as and then insert the username and password from the administrator user.

Windows Tips; Repair on IRPStackSize


Hello, this time I will share tips on the Windows system error. It has been taken from my real experience.

Exactly one day ago, when I check the event viewer from my Windows machine I found some errors. It repeated periodically. That's why I want to write this for your Windows tips. The source is Srv, which related to event 2011. When we clicked the report twice (event viewer logs), so we will see the Event Properties like the picture below.

IrpStackSize proeprties

The Description from the Properties above tells us that: The server’s configuration parameter "irpsracksize" is too small for the server to use a local device. Please increase the value of this parameter. I really do not know the direct effects of these Windows errors, but when I shut down the computer, blue screen appears and the computer cannot be turned off.

If you are experiencing the same thing, please do the following Windows tips:
  1. Go to regedit.
  2. Export current registry configuration first, click File > Export and give the name.
  3. Go to HKEY_LOCAL_MACHINE\SYSTEM\CurrentControlSet\Services \LanmanServer\Parameters.
  4. In the right pane, double click IRPStackSize or if no one there please create a new Dword value with name IRPStackSize (case sensitive).
  5. In the Base section, select Hexadecimal.
  6. Give a value among 15-50, match your needs. I gave the value 25 on my Windows computer.
  7. Log off and Log in back.
You can check the result when you shutting down your machine. It works in my "Windows machine", hope it work too for you.
Ok, that’s all my computer tips today. Give your feedback for the better Windows tips.

Tips to Monitor Registry Activity; Windows Tips


Today, I'll share you a bit of Windows tips. We'are talking about Windows registry now.The Registry is a database used to store settings and options for the Microsoft Windows Operating System.

It contains settings for low-level operating system components as well as the applications running on the Windows platform: the kernel, device drivers, services, SAM, user interface and third party applications all make use of the Registry.

Monitor the registry is an act that is extremely useful, especially for those of you lovers of the Windows operating system. Now I will explain the 2 Windows tips to monitor the registry, use registry auditing and registry monitor (regmon.exe).
Using registry auditing:
  1. Open the registry editor (regedit.exe).
  2. In the left pane, browse to the key you want to audit.
  3. Right-click the selected key, and select permissions.
  4. Click the Advanced button > Auditing > Add.
  5. Enter the object name, and select the type of auditing in the Auditing Entry.
  6. Click OK.
  7. Open Local Security snap-in (type "secpol.msc" in the Run dialog box)
  8. In the left pane go to Local Policies > Audit Policy.
  9. In the right pane, double-click on Audit object access.
  10. Check the box beside Success to audit successful actions or Failure to audit failure actions.
  11. OK.
Using the regmon.exe:
It’s quite simple, just download it from softpedia buddy.
OK, that's all. Hopefully it will usefull for you. See you in the next Windows tips .

Viewing Shared Folders; Network Tips


Hello, meet again with thecyebrgal. Now, I will share tips on how to view shared folders.

This may sound familiar to you, but this network tips is particularly important for me. This stems from my experience, when I use my office computer that was once used by my friend. He (my friend) shares several folders and I want to close some shared folders by my friend for some security reasons.

Surely it will take so long time when we find a shared folder by check is there a hand icon under the folder which is the sign of shared folders. To facilitate you, please go to command prompt and type "net share".

net share; thecybergal.blogspot.com
Click the picuter for detail view

It makes clear view from the shared folders on your computer. But, if you want a more complete you can set it via computer management. Simply write compmgmt.msc on the Run dialog box > System Tools > Shared Folders > Shares. In the right pane, manage your shared folder as you want.

Click the picuter for detail view

You can use right-click on the selected folder for more commands.
Good luck, see you in the next tips.

How To Edit boot.ini File; Windows Tips


boot.ini is very important file. The first thing had done by Windows system is running NTFS like: ntldr, ntdetec.com, nt.sys and also the boot.ini file when the computer turned on (booting).

This file type (boot.ini) is almost similar to the autoexec.bat file on the DOS system. So, the Windows boot process is very dependent on this file.

Changes you had done in this file will change your computer booting configuration. Before you make a change I suggest you backup these files first.
To change the file, follow these steps:
  1. Go to command prompt and move to the root of drive C: (cd\) and press enter.
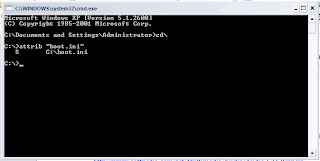
  2. Remove all attributes from boot.ini file. E.g.; attrib –s –h –r “boot.ini” (the attrib parameter depends on your boot.ini attributes).
    boot.ini attributes
  3. Open notepad and open the boot.ini file (it located on C:\). Make sure you have changed the File Type into All Files in the Open dialog box.
  4. Change as desired and store the results of these changes.
The change can give you some benefits, like when you change the portion /noexecute and give the value with AlwaysOff (the default is OptIn). The change like the example above used for turn off DEP (Data Execution Prevention) which make the computer failure to booting because improper configuration of any hardware or software.

boot.ini overview

Ok, that’s all the Windows tips today. I hope it will useful for you. Give your feed back and see you in the next tips.

WinLAME; Trick To Resize Your Audio Files


This may sound like an old trick for you, but I don't think much about it because I just want to share.

This time I will share software just for you. This software allows you to compress audio files. It supports many audio file formats. The large audio files will take some space from your music player, like on a computer hard disk or memory stick on your phone and so forth.

This software can be downloaded easily and run in all Windows systems. Because the size and ability, maybe it will be the tool that you store in your flash disk and take it wherever you go.

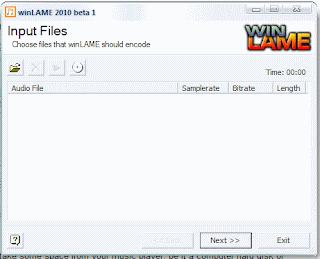
WinLAME picture
click the picture to get detailed view

This software named winLAME, and you can download it for free. Intrigued with this software, you can download it here
Give your feedback and see you on the next Windows Tips.

Windows Tips; Check Your File Activity


This computer tips talking about your files and hard disk activities. Have you ever felt that your hard disk worked so hard or LED indicator flashing when you do not perform any activity on your computer?

Maybe you feel do not open or run any application, but something is still accessing your hard disk and you keep looking for answers. So, I would like to share some pretty tips for you.

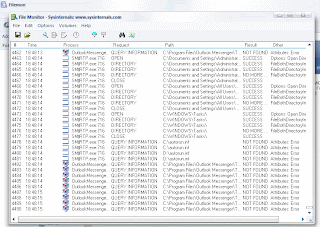
Yes, the answer is something is accessing your hard disk and it's a very logical answer. If you do not know what is accessing your hard disk, you can use software from Sysinternal called Filemon.exe. This program runs only on Windows platform.

Filemon will monitor and display files system activity on a Windows system in real-time. Its advanced capabilities make it a powerful tool for exploring the way Windows works, seeing how applications use the files and DLLs, or tracking down problems in system or application file configurations. It was very simple in use and installation process.

All you need is that you have permissions as an "Windows administrator" of the computer and you just copy files to the hard disk.
So simple isn’t it? Yup, so simple and so useful for a little computer repair jobs.

file monitor view

Just click this text to download that.
See you on the next tips.

What Is Alcmtr.exe; Windows Issue


This morning when I open the registry editor, accidentally I found the odd values which located under HKLM\SOFTWARE\Microsoft\Windows\CurrentVersion\Run. The odd value is alcmtr.exe. I find out information about the file using Google and found some answers here.

alcmtr.exe
click the picture to see detailed view

After I read and studied about alcmtr.exe, it turns out this file is part of RealTek AC97 Audio Driver. The file stored in the folder C:\Windows

alcmtr location
click the picture to see detailed view

So we can take some conclusions about this file, that:
  1. alcmtr.exe is not a spyware.
  2. alcmtr.exe is not an adware or popup.
  3. alcmtr.exe is not a Trojan or virus.
  4. You don’t have to delete it and you don’t have to worry about it.
  5. Be careful about something that you didn’t know, maybe it was a dangerous file or may be also an important file.
  6. Update your antivirus regularly.
See you in the next post. Give your feed back for the better post, thank…

Run Commands: Windows Tips


On the past occasion I have briefly explained some tricks on how to use Microsoft Natural Keyboard Shortcut.

Combination between the Windows logo and certain buttons can display something very useful for you.

Now I'll write some commands that will be useful when you write it in the Run Windows. Please try one by one to determine the purpose of each command.
  • CONTROL: opens the control panel window
  • CONTROL ADMINTOOLS: opens the administrative tools
  • CONTROL KEYBOARD: opens keyboard properties
  • CONTROL COLOUR: opens display properties.Appearance tab
  • CONTROL FOLDERS: opens folder options
  • CONTROL FONTS: opens font policy management
  • CONTROL INTERNATIONAL or INTL.CPL: opens Regional and Language option
  • CONTROL MOUSE or MAIN.CPL: opens mouse properties
  • CONTROL USERPASSWORDS: opens User Accounts editor
  • CONTROL USERPASSWORDS2 or NETPLWIZ: User account access restrictions
  • CONTROL PRINTERS: opens faxes and printers available
  • APPWIZ.CPL: opens Add or Remove programs utility tool
  • OPTIONALFEATURES: opens Add or Remove Windows component utility
  • DESK.CPL: opens display properties. Themes tab
  • HDWWIZ.CPL: opens add hardware wizard
  • IRPROPS.CPL: infrared utility tool
  • JOY.CPL: opens game controllers settings
  • MMSYS.CPL: opens Sound and Audio device Properties. Volume tab
  • SYSDM.CPL: opens System properties
  • TELEPHON.CPL: Opens phone and Modem options
  • TIMEDATE.CPL: Date and Time properties
  • WSCUI.CPL: opens Windows Security Center
  • ACCESS.CPL: opens Accessibility Options
  • WUAUCPL.CPL: opens Automatic Updates
  • POWERCFG.CPL: opens Power Options Properties
  • AZMAN.MSC: opens authorisation management utility tool
  • CERTMGR.MSC: opens certificate management tool
  • COMPMGMT.MSC: opens the Computer management tool
  • COMEXP.MSC or DCOMCNFG: opens the Computer Services management tool
  • DEVMGMT.MSC: opens Device Manager
  • EVENTVWR or EVENTVWR.MSC: opens Event Viewer
  • FSMGMT.MSC: opens Shared Folders
  • NAPCLCFG.MSC: NAP Client configuration utility tool
  • SERVICES.MSC: opens Service manager
  • TASKSCHD.MSC or CONTROL SCHEDTASKS: opens Schedule Tasks manager
  • GPEDIT.MSC: opens Group Policy utility tool
  • LUSRMGR.MSC: opens Local Users and Groups
  • SECPOL.MSC: opens local security settings
  • CIADV.MSC: opens indexing service
  • NTMSMGR.MSC: removable storage manager
  • NTMSOPRQ.MSC: removable storage operator requests
  • WMIMGMT.MSC: opens (WMI) Window Management Instrumentation
  • PERFMON or PERFMON.MSC: opens the Performance monitor
  • MMC: opens empty Console
  • MDSCHED: opens memory diagnostics tools
  • DXDIAG: opens DirectX diagnostics tools
  • ODBCAD32: opens ODBC Data source Administrator
  • REGEDIT or REGEDT32: opens Registry Editor
  • DRWTSN32: opens Dr. Watson
  • VERIFIER: opens Driver Verifier Manager
  • CLICONFG: opens SQL Server Client Network Utility
  • UTILMAN: opens Utility Manager
  • COLORCPL: opens color management
  • CREDWIZ: back up and recovery tool for user passwords
  • MOBSYNC: opens Synchronization center
  • MSCONFIG: opens System Configuration Utility
  • SYSEDIT: opens System Configuration Editor (careful while using this command)
  • SYSKEY: Windows Account Database Security management (careful while using this command)
That’s all the tips today. Hope it will be useful for you. See you in the next tips, if you have any other tips please divided for shared knowledge with us.

Looking Who Last Accessed a File; Admin Tips


This tip is to monitor who last accessed a file and may be useful for you (Administrator). To be able to do that, you should enable auditing on a file.

To enable auditing, you have to enable auditing at the server level on the Windows security policy and then enable auditing on the particular object (in this case, a file) which you are interested.

Do the following to enable auditing at the server level:
  1. Press Windows Key + R and type "secpol.msc".
  2. In the left pane, expand Local Policy and click on Audit Policy.
  3. In the right pane, double-click Audit object access.
  4. Check the boxes beside Success or Failure (as needed).
  5. Click OK.
And the next step is, you must enable auditing on the target file or folder from "Windows Explorer".
  1. Open Windows Explorer.
  2. Browse to the files or folders you want to audit.
  3. Right-click and select Properties.
  4. Select Security > Advance > Auditing and click the Addbutton.
  5. Enter the user or group you wan to audit access for and click OK.
  6. In the Auditing Entry dialog box, select the type of access you want, click OK when you finish.
  7. Apply.
It’s look pretty to know who last accessed or modified a file or folder you have configured. Give attention when enabling auditing on a frequently accessed set of files or folders. The number of audit messages in the Security event log can grow quickly with just a few accesses of the file. So, think wisdom please.
Click to see detailed picture

Replacing In-Use File; Windows Tips


Have you replace a file but error message appears and says something like the moving can not be continued because the file is in use.

The errors occur when a file that will be replaced is protected by the system.
error-moving, error to replace
Click to see detailed picture

Usually the files are protected by the file system is important (core files). This is very good to protect files from changes that could damage the system performance. But if you feel you have to make a replacement, you can overcome this with some pretty powerful methods. You can try to boot from safe mode, but sometimes there are files that can not replaced even in safe mode.

Do these steps to replace in-use files:
  1. Launch your registry editor: go to Run, type "regedit" on Windows XP or 2003, or "regedit32" on Windows NT or Windows 2000.
  2. Browse to HKEY_LOCAL_MACHINE\SYSTEM\CurrentControlSet\Control\Session Manager.
  3. Right Click on the right-pane, New > Multi-String Value > and give the name as PendingFileRenameOperations.
  4. Double-click our new Multi-String Value (PendingFileRenameOperations) and assign the value data.
  5. The format to assign the value data is as follow:
    • On the first line enter \??\ followed by the path of the new file. Please note, to put the new file on the fix HDD, because the replacement process will be done after the machine is rebooted
    • On the second line enter !\??\ followed by the old file.
      multi string value
      Click to see detailed picture
  6. Click OK to save the changes.
  7. Close the Registry Editor.
The sample file above is not important file which protected by Windows System. If you going to replace the important file (protected by Windows) give extra-caution, whenever replacing files, it may harmful your systems.

OK, that’s all, I hope the tips above are useful for you, see you on the next tips…
Adopted from: techbytes.com

Blocking Auto Update Windows; Windows Tips


Hello, meet you again with thecybergal. On this time I will discuss ways to block the Windows automatic update.

Update your Windows on a regular time basically is a very good thing and this is recommended because for some "security reasons". Of course this is only for them who use original version. If you use cracked Windows, then you should look for Windows activation tool first.

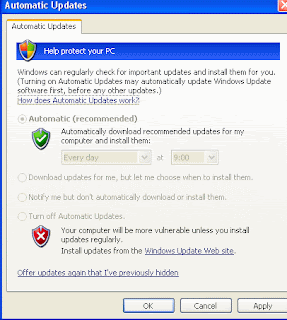
For you who used the cracked Windows and do not want to update the patch because you have confidence in your Anti Virus, then you can disable the Windows automatic update. This can easily be done by logging into the control panel, automatic updates, and select "turn off automatic updates". For some reason, we can’t choose to turn off automatic update (exactly, I didn’t know how can this trouble happens).

Click to see detailed picture

How can we overcome thus problem, is there another way to turn off the automatic update? Yes, of course, we can do it by typing something in the command prompt. Just simply, type "reg add HKU\.DEFAULT\Software\Microsoft\Windows\CurrentVersion\Policies\Explorer /t REG_DWORD /v NoWindowsUpdate /d 1".

So easy, isn’t it? The syntax above is not case sensitive, so you are free to choose large or small letters in writing tips above.
See you next time, there are many tips we will learn together.

Creating A Program Alias, Windows Tips


Alias, we can say as a short name of a command. It enables a replacement of a word with another string.

A program alias is a little different from a shortcut or link. In the UNIX platform, we also know the alias-command whose function is similar to the alias that we will discuss now. Type an alias is easier than writing the complete command in Windows.
Consider the following analogy:
Write down "compmgmt.msc" in Run dialog box is easier than click on the Start menu > Administrative Tools > Computer Management, but typing "cmg" is the easiest way among of them. So, how can we make "cmg" can serve to open the computer management?

Do the following steps:
  1. Create a new sub key under the following key: HKLM\SOFTWARE\Microsoft\Windows\CurrentVersion\App Paths
    The name of the sub key should be alias name. If you do not want to write extensions when using the alias, put .exe at the end of the name. You can give any name, but you must write the "extension" of the alias name if you do not put .exe at the end of the alias name. In this case, we will use cmg.exe as the alias name.
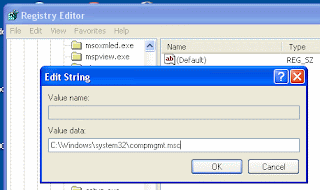
  2. Modify the default value under the new sub key. It shows up with the name (Default) in Registry Editor. Enter the full path to the program you are creating an alias for, which in this example would be C:\Windows\system32\compmgmt.msc.
    Sub key's name for the alias
    Click to see the original size
  3. Test your job by typing "cmg" in the Run Windows.
That’s all the tips today, hope it will be useful for you. See you next time in the other Windows tips.

Adopted from: Windows Server Cookbook, Robbie Allen. Say thank to him

Windows Tips: Make A New Folder


This is a simple trick, but I think this trick can save you time. Without the long-speaking, I will explain the usefulness of this trick.

In this trick we use "mini software" called "NewFolder". Before we learn any further, I would ask how you create a new folder in Windows Explorer. Probably most of you use the Right-Click > New > Folder in the right pane of Windows Explorer. I think it wastes your time.

You can download the software here. Just simply copy it on your fix HDD, double-click and press install. It will add registry entries for the Windows Explorer right click context menu (right pane Windows Explorer). See the screen shot bellow.


So easy and fast isn’t it? Please try it on your computer and give your feedback. That’s all. I think it is a "simple tips" but very useful. See you again in the next tips. Bye...


Adopted from: createwindow.com

Windows Tips: Create Virtual Drive


This is included Windows tips. On this chance I wanna share tips about the "command prompt" in Windows.

These Windows tips may have been heard hackneyed, but what's wrong about sharing something to you :D. These tips tell you about how to create a folder path of a drive to be a separate drives.

Let’s take an example:
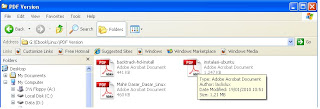
Folder "G:\Ebook\Linux\PDF Version" is a folder that I access frequently. Address path of the last folder (PDF Version) looks so long.
long path address
So I plan to make the long path address to be a short one (H:\).
Look at the both addresses above, drive H:\ absolutely short and easy to type in the command prompt Windows than the first one.
short path address

So how to make it? Follow these steps:
  1. Go to command prompt (Windows Key + R) and type "cmd" without quotes.
  2. According to the example above, we will change the address G:\Ebook\Linux\PDF Version into drive H:\. Just type the syntax, (subst h:\ "g:\ebook\linux\pdf version") without brackets.
  3. Pay attention about the syntax above, that the virtual drive (H:\) is written before the original drive (G:\Ebook\Linux\PDF Version)
  4. Just that, it's easy isn’t it?
A bit guidance about this virtual drive (H:\):
  • The drives are removed after reboot.
  • Whatever you have done will affect the both drives. Something likes a hidden synchronization.
  • Shadow copies are not created.
  • Deleting the virtual drive deletes only the mapping, not the data.
Be careful, it’s quite useful but you have to be a “smart” user.
Okay, see u on the next Windows tips

Windows Tips: SFC Without Installation Disc


One of the many tips in the windows system is SFC.

SFC stands for System File Checker which allows users to scan for and restore corruptions in Windows system files. SFC can be found in Windows 98, Windows 2000, Windows XP, and Windows Server 2003. If you are using Windows Vista, then you can use the Windows Resource Protection as a substitute for SFC.

Since we will restore a "corrupt registry" using the SFC, you are prompted to insert Windows Installer CD in accordance with the system you use. The problem is how if you do not have the Windows Installation CD but you have a Master Installer on your hard disk. Could we run SFC without using the CD, but using the Master Installer on our HDD? If it becomes your problem, try some of these tips bellow:
  1. Copy the i386 folder from Installer Windows CD to drive C: or D: on your PC. Let's just say you put it in drive D:
  2. Change the source file in the registry to "D:\". Look in the following key: HKEY_LOCAL_MACHINE\SOFTWARE\Microsoft\Windows\CurrentVersion\Setup and change the value of SourcePath to D: (customized to your location) and also change the value of ServicePackSourcePath to D: (customized to your location).
  3. HKEY_LOCAL_MACHINE\SOFTWARE\Microsoft\Windows NT\CurrentVersion, change the value of SourcePath to D:\ i386 (the drive adjusted to the location of i386 folder on your PC).
  4. Press WindowsKey + R, and type "sfc /scannow" (without quotes) and click OK.
  5. That’s all, if you have difficulty, re-view the steps above carefully.
So, if there are some corruptions in your "Windows system" file, do not think to reinstall especially reformat your hard disk. But, identify the main problem first and try several methods related to your problem.
I hope the "tips" repairing windows above useful to you, see you next time.
Thanks to ErEll4’s Blog at http://asmssl0812.blog.friendster.com

Windows Tips: Hide Your Files


This computer tips are talking about hiding your files.

The files that we are talking about are *.rar or *.zip files and they will be combined with *.jpg files, so the original file (*.doc, *.xls, *.ppt, & anything others) "will be considered" as an image file (*.jpg, *.bmp, *.png, & something like that).

These protection tips aren't Linux tips but absolutely Windows tips.
The most fundamental thing is that you make sure the file you'll be hidden was been archived into a *.rar or *.zip format. After all files converted into *.rar or *.zip format, then you can insert it into the image file to be hidden. Follow the instructions bellow:
1. Prepare *.rar or *.zip file that will be hidden. E.g. myfile.rar
2. Prepare an image file. E.g. pict1.jpg
3. Save all files (myfile.rar and pict1.jpg) into one drive and directory. E.g. D:\
4. Open command prompt, and go to drive D. E.g. D: (press enter)
5. Type this command (without quotes) and press enter:
"copy /b pict1.jpg+myfile.rar result.jpg" (it will create a new file, result.jpg).
result.jpg is a file which contains myfile.rar and pict1.jpg but appears as a standard image file.
6. To open the result file (result.jpg) just right click ==> Open with ==> and select winrar or winzip (hidden files visible!!!).

Note: make sure all files you named have no space (E.g. my file.rar <== incorrect name). The security tips above are great to gives you minimal protection from the hands of people who want to know your personal files. Good luck!!!

Network Tips to Speed Up Firefox


These "windows tips" are about firefox tuning.

In my previous post, I have explained the network tips to speed up firefox.
Now I will give more detailed tips to speed up firefox. Follow the instructions below:
  1. Open firefox, type "about: config" (without the quotes) and press enter. If some parameters are not yet available, you can create it yourself by doing these steps:
    • Boolean parameters: right click on the firefox's window > New > Boolean > give the name > select true or false.
    • Integer parameters: right click on the firefox's window > New> Integer > give the name > give the value.
  2. Add/ change these parameters:
    browser.tabs.showSingleWindowModePrefs = true
    network.http.max-connections = 64
    network.http.max-connections-per-server = 20
    network.http.max-persistent-connections-per-proxy = 10
    network.http.max-persistent-connections-per-server = 4
    network.http.pipelining = true
    network.http.pipelining.maxrequests = 100
    network.http.proxy.pipelining = true
    network.http.request.timeout = 300
    nglayout.initialpaint.delay = 0
    network.http.request.max-start-delay = 0
    network.dns.disableIPv6 = true
  3. Restart your firefox.
Now, you can feel the difference in speed between modified firefox with your default firefox. The computer tips above are very absolutely useful for you who use the old machine. Good luck...

SMS, The Small but Strong Message Service


sms service
Technology is a very primary thing today. One of them is mobile technology. Mobile technology gives you easily access to the technology though you're traveling. Mobile technology consists of telephone conversation, short messages (sms), and packet data (the most popular now). Sms is the cheapest among the three. For most young people SMS became the most popular trends to communicate. Via sms we can send information briefly, solidly, and clearly.

IM3, a product of PT Indosat Tbk. is one of the cellular operators which focused on sms. It offers cheap rates and tens free sms bonus every day. Not only that, now IM3 begins providing total services, such as Moslem praying times, road maps, gas stations, and others. This is a matching service developed in Indonesia. Maybe in other countries these services are very different. It depends on the individual needs of the majority of its people. To learn about some sms services provided in another country, maybe you can find more detailed information here: pankaj shah 4info.

Returnil, an Alternative Ways when Your Deep Freeze Hacked


Some days ago, I have told you how to hack Deep Freeze 6. Now, I'll share you alternative way related to network protection.

Since Deep Freeze 6 can be hacked, you may try looking for something which has the same function as a Deep Freeze.
Now, I'll give you the answer. The answer is Returnil Virtual System. It immunes your computer from malmware infection. It was released not only in Professional Version but also in Personal Version.
Like a Deep Freeze, the RVS keeps your computer from unwanted change. The different is RVS work on Active Windows Directory only.

For example, as your "Windows System" installed on C and you have just installed the RVS, so everything about alteration will be cleared when the computer restarted.

Make sure you save your current documents outside of Active Windows Directory, e.g. drive D. when you have just one partition, RVS gives you way to create a virtual partition until your current documents can be saved there.
Want to try this tool on your Windows Computer, you just need to click Returnil Virtual System to download.
OK, that’s all today. Hope it useful for you…

The Configuration to Speed Up Browsing Speed


Today, I'll share you how to speed up your browsing speed.

You knew, on my previous post we have talked about how to make firefox faster. Remember, this is not speed up your internet connection but speed up your browsing speed.
The tricks we will talking starts from gpedit. gpedit is a group policy editor from Windows XP. So for you who used another OS, from my deepest heart I'm sorry so much.
The tricks are bellow:
  1. Press Windows button + R.
  2. Type gpedit.msc and press enter button.
  3. Under Computer Configuration go to Administrative Templates.
  4. Go to Network.
  5. Click QoS Packet Scheduler.
  6. Look for the right column, double click Limit Reversable Bandwith and make it enable.
  7. On Bandwith Limit (%), change the value to be 0 (zero).
  8. Apply and Ok.
  9. Restart your computer.
That's all the tip today. Say thanks to masjun.
Hope it helps...

Windows Virtual Memory Too Low


This trick is used to overcome the windows virtual memory warnings.

Windows Virtual Memory alters free space on your hard disk as virtual memory. The conclusion is your computer have two different memory types, the physical memory (RAM) and virual memory.
When the virtual memory is too low, the Windows give you a warning to change the size of virtual memory. These are the steps to change the size of your virtual memory:
  1. Right click My Computer, select Properties.
  2. Under Advanced tab, point your view to Performance and click Settings.
  3. Select Advanced tab and click the Change button.
  4. Initial size, give the value which is not larger than Maximum size.
  5. Maximum size, give any value. The default is thrice from the physical size.
  6. Click Set, and press OK for each appeared windows.
That's all, I hope it's useful for you. Leave your comments or suggestions for better post.

Trick To Block Facebook


This trick is used to block facebook.

Actually, not only facebook can be blocked but also any web addresses, you just have to apply the same principles. As you know, on my previous post which talking about Proxy Server Bypassing via Decimal IP I have shared you how to log on to blocked facebook. So, I think you can call this post as a "counter post" against that post.
Select one of these trick:
  1. Use Parental Control feature from your AntiVirus and type www.facebook.com as blocked address.
  2. Go to "C:\WINDOWS\System32\drivers\etc". Double click the hosts, on the open with window select notepad. At the end of file type:
    127.0.0.1 www.facebook.com
    127.0.0.1 69.63.176.140

    Close and save the changes.
  3. Almost same with the previous trick, you just type the following text in the end of file:
    0.0.0.0 facebook.com
    0.0.0.0 facebook
    0.0.0.0 www.facebook.com
    0.0.0.0 http://facebook.com
    0.0.0.0 http://www.facebook.com
    0.0.0.0 69.63.176.140

    Close and save the changes.
  4. Select one of the trick above, which one most you like.
You can undone the block by restore it (hosts) to the default code.
Ok, taht's all from me. I hope it usefull for you.
Special thanks to masjun.net