Windows Tip: How to Find the Correct Driver


At this post, thecybergal will try to discuss how to find the correct driver from the device in our Windows OS computer. Driver is a high level programming language used to communicate with hardware devices.
When there is a device that did not have the correct drivers installed, the device will not be able to work maximum, even can’t work at all. To determine whether the device from our Windows computers has the proper drivers installed, you can open the Device Management by typing "devmgmt.msc" in the Run box from our Windows OS.

If there is a device that did not have the correct drivers installed, you will see an exclamation sign in front of the device name. To find the correct drivers, you can perform the following steps:
  1. Highlight the device that has no correct driver installed. Double click on the device so you will see the Properties box.
  2. Go to Details tab. In the drop down menu that appears select "Device Instance Id" (This is the default option).
  3. Copy (Ctrl + C) the information in the box under "Device Instance Id".
  4. Go to http://www.devid.info/en/.
  5. Paste (Ctrl + V) the copied information.
  6. Download the driver in accordance with Windows OS on your computer.
That’s all the Windows tips from thecybergal. Hopefully the above Windows tips can be useful for you. Thecybergal also says thank to devid.info which had provide a bank of hardware driver: D. The method to find the correct driver mentioned above work on Windows XP, Windows Vista, also Windows 7. See you in the next post.

Windows Tips; How To Hide Your Local Drives


Hello thecybergal readers, on this post thecybergal wanna share you simply Windows tips to hide your local drive. Although this tips quite simple, but I thought it would help you to at least secure your data in the selected drive from unauthorized user (just from newbie user of course :D).
Ok, let’s get it done by following these steps:
  1. Open Registry (Start > Run > type "regedit" > [press the enter button]).
  2. Before you make any changes to your Windows registry, make sure you have back it up. (File > Export) and give any names.
  3. Go to HKEY_CURRENT_USER\Software\Microsoft\windows\CurrentVersion\Policies\Explorer
  4. Modify or make new DWORD Value named "NoDrives".
  5. For the Value, use method bellow (2^n):
    n = 0 : Drive A = 2^0 => 1
    n = 1 : Drive B = 2^1 => 2
    n = 2 : Drive C = 2^2 => 4
    n = 3 : Drive D = 2^3 => 8
If you want to hide drive C, then the value of NoDrives = 4. If you want to hide drive D, then the value of NoDrives = 8. But if you want to hide drive C and D, then the value of NoDrives should 4 + 8 = 12. Hope you understood ^_^.

That’s all Windows tips today, hope you can get a bit of Windows science. See you in the next thecybergal's Windows tips.

Yups, this is the screen shoot:
hidden computer drive
Hidden computer drive pic

Excel Password Remover | Ms. Office Tips


In this post thecybergal will discuss how to open the protected sheet or workbook on Microsoft Excel. If you intend to finish your excel job, but a warning message appears tell you that the cell or table where you will write your job is protected I think this post is suitable for you, IMHO
Excel Protected Sheet

Actually open the protected sheet in Microsoft Excel can be done in various ways. One of them is Advanced Password Recovery Office. But if you don’t want to install any new programs on your computer, then this trick will probably be the right option. I am using Excel Password Remover program from straxx.com. Just click > Excel Password Remover to download and use it for free.

For the complete download list, go to Download Tools.

After you download Excel Password Remover, then extract the file and you will find a file called password.xla. What you should to do is copy the file (password.xla) into C:\Program Files\Microsoft Office\OFFICE11\add-ins. Open your excel file (the protected excel) > Click on the Tools > Unprotect Sheet (if you want to open protected sheet) or Unprotect Workbook (if you want to open a protected workbook)

If the first method above didn’t worked, then you can try the second method. Let’s say it as Plan B :D
  1. Open Microsoft Excel > Tools > Add Ins
  2. Click on Browse > Find the location where the recent downloaded add ins located (password.xla) and click OK
  3. Open the protected excel file.
  4. Select Unprotect Sheet or Unprotect Workbook (Depends on what will you like to open).
This trick doesn't work to Microsoft Excel 2007 but it works fine on Excel 5.0 and above (including Excel 2000, XP and 2003). If you need to Unprotect Microsoft Excel 2007 Sheet or Workbook, please give your feedback to thecybergal. I will try to looking for some answers :D

Make USB Windows Installer with WinSetupFromUSB | Windows OS Tips.


Hello thecybergal readers. Making the Windows installer with USB stick media not as difficult as what we thought. This process is quite challenging, and in the end when you successfully about that, then the sense of satisfaction will be found. In this article, I recommend you using WinSetupFromUSB to make Installer Windows OS from USB stick.

WinSetupFromUSB is quite simple with a good success rate. OK, without a lot of speaking, if you want to create a Windows Installer from USB stick, please click WinSetupFromUSB to download the software. To get complete downloadable softwares, click download tools here. After the software downloaded, then follow these instructions bellow:
  1. Install WinSetupFromUSB into your Windows OS. (XP, Vista, 7).
  2. Prepare your USB stick as the Windows installation media. Make sure you've made backups of the contents of your USB stick, because this process will format your USB stick.
  3. Create a folder to store the Windows Installer file (e. g. D:\WinXP). Copy all files from the Installation Disk into the folder (D:\WinXP).
  4. Run WinSetupFromUSB while your USB stick mounted.
  5. Select the Installation Source (D:\WinXP).
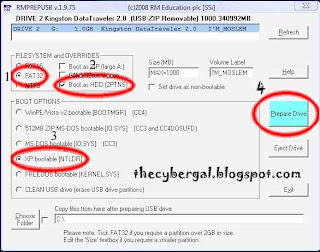
  6. Format your USB stick by pressing RMPrepUSB button. To the better performance, select FAT16 if your USB Disk is less than or equal to 2 GB, and select FAT32 if your USB Disk is more than or equal to 4GB.
  7. Checkmark on Boot as HDD (2PTNS), and under Boot Options adjust to the which Windows loader will be installed. If you want to make a Bootable USB XP Installer, select XP Bootable (NTLDR).
  8. After all configurations finished, click on Prepare Drive.
    winsetupfromusb settings
  9. Copy all files from folder we created (D:\WinXP) by pressing Go button, if you see License Agreement window, just go ahead and click Agree.
  10. Change your Boot Sequence to USB stick. This installation steps have two parts. You have to select First Part until the computer restarted, and again boot from your USB stick and select the Second Part when the initial setup screen appear.

NB. When you think to install Windows XP on Built Up PC or Netbook like HP Mini 110-1100 Tord you must slipstream the SATA driver to prevent from BSoD during installation process. Again, why I use WinSetupFromUSB because when I used other method I always get the Error Message which tell me about "INF file txtsetup.sif is missing or corrupt, status 18". Since I found WinSetupFromUSB this problem can be healed successfully.

Ok, that's all Windows OS tips today. I hope you can get some advantages from my short passage and you'll be right back here (to looking for pretty tips of course)... See you in the next thecybergal tutorial...

Win XP as A Simple Router | Network Computer Tips


Hello blogger holic, after I told you a security tips about securing your computer from offline viruses using USB Disk Security, now thecybergal will tell you a method to make your Windows XP as a simple router. As we known, router used us to make some connections among two or more different network.

We usually use Pure Router "to bridging" different network connections. There is a wide variety of Pure Router which we can use as a router in our network like MikroTik, IPCop, PfSense, Ubuntu Server and so on. But in this passage, we will discuss about XP Router.
So, does Windows XP can work like a Pure Router? Yes, of course it can although there are many features that can be handled by XP Router. Let’s get it done.

xp router, thecybergal.blogspot.com
xp router topology | thecybergal.blogspot.com
From the picture above, the Internet network (Red) has the IP segment 192.168.1.X, HotSpot Network (Blue) has the IP segment 192.168.20.X and LAN (Green) has IP segment 10.10.10.X. With topology as above, then XP Router requires at least three NICs, namely for the network of Red, Green, and Blue.

The following are IP settings for the third NIC on the "PC XP Router":
NIC for Green connection:
  • IP: 10.10.10.1
  • Netmask: 255.255.255.0
  • Gateway (GW): [left it blank]
NIC for Blue connection:
  • IP: 192.168.20.1
  • Netmask: 255.255.255.0
  • Gateway (GW): [left it blank]
NIC for Red connection >> IP settings depends on the ISP where we rented bandwidth (static or dynamic). We assume that we use static IP address:
  • IP: 192.168.1.5
  • Netmask: 255.255.255.0
  • Gateway (GW): 192.168.1.1 (IP from our ADSL Modem)
All of three different networks above must have different IP segments/should not be the same between Red, Green, and Blue.

IP configuration of each computer (under XP Router).
Green
  • IP: 10.10.10.2-224
  • Netmask: 255.255.255.0
  • Gateway (GW): 10.10.10.1 (This gateway leads to the Green NIC XP Router)
Blue
  • IP: 168.20.2-254
  • Netmask: 255.255.255.0
  • Gateway (GW): 192.168.20.1 (This gateway leads to the Green NIC XP Router)
When you finished, let’s play with your XP Router.
  1. Go to Regedit.
  2. HKEY_LOCAL_MACHINE\SYSTEM\CurrentControlSet\Services\Tcpip\Parameters
    Change the value of IPEnableRouter Right-click > Modify > Value Data change the value to be 1.
  3. Close the Registry Editor, and restart your XP Router. Now, all of your Network PC can be connected to the Internet. Pay attention to restart your XP Router before it can be worked properly.
OK guys that are all XP Router for you. I hope it can be useful when you have no any Pure PC Router as an alternative method for you to stay connected. See you on the next thecybergal tips.

Adapted from: http://www.home-network-help.com/

Windows Security; USB Disk Security, Protect from Offline Virus


Hello guys, I wanna share to you about security tool. This is quite simple but strong tool. USB Disk Security, the tool called. It has publicized by Zbshareware Lab to protect the spread of the flash disk viruses.
It has 7 main windows. Unlike antivirus programs which generally takes a lot of memory, USB Disk Security just uses about 2,152 K of your RAM.

USB Disk Security, thecybergal.blogspot.com

If there is an autorun file in flash disk, "USB Disk Security" gives you a warning and you can decide what steps you would take on the autorun file. Again, it’s very different from some antivirus programs which frequently encountered where some of them simply delete autorun file.

We knew that not all autorun programs were bad. Here’s a bit screenshot of the USB Disk Security when it found an autorun file from a flash disk.

USB Disk Security, thecybergal.blogspot.com

Actually, this post is enchantment from this post USB FlashDisk Security.
Just click here to download and enjoy it.

For the complete download page, go to Download Tools Page here.
See you in the next Windows security tips.

Windows Tips; What cndrive.exe Is?


Hello everybody, very long times thecybergal has no ideas to post something useful for you. Now, I will try to give some information about something like Trojan which called cndrive.exe. The name of cndrive.exe is given by SmadAv antivirus. It did bad things like cutting your internet connection. Here’s the simple descriptions about cndrive.exe:

  1. Category: backdoor Trojan, network aware worm.
  2. Process name: cndrive32.exe.
  3. File location: %systemroot%\cndrive32.exe.
  4. Size: 339,968 bytes.
  5. Registry Activity:
  6. *[HKEY_LOCAL_MACHINE\SOFTWARE\Microsoft\Windows\CurrentVersion\policies\Explorer\Run] > Microsoft Driver Setup = "%Windir%\cndrive32.exe". *[HKEY_LOCAL_MACHINE\SOFTWARE\Microsoft\Windows\CurrentVersion\Run] > Microsoft Driver Setup = "%Windir%\cndrive32.exe".
That’s all brief descriptions about cndrive32.exe. If your AntiVirus program can easily remove the Trojan, I think you got some good protection. But if you felt disturbed about this Trojan and your AntiVirus seems not good, you may manually block this Trojan process. Do these steps:
  1. Run, and type "gpedit.msc". Go to User Configuration > Administrative Templates > System and double click Don’t run specified Windows applications.
  2. Set to Enabled, click Show button next to List of disallowed applications. Click Add button and enter the name (cndrive32.exe).

    cndrive32_picture taken from http://thecybergal.blogspot.com/2010/07/windows-tips-what-cndriveexe-is.html
    cndrive32.exe by thecybergal
  3. If there are other programs that you suspect, just enter the name of the program such as the steps above.
Ok, buddy. That’s all a bit of Windows tips today. I hope you get something useful by reading thecybergal. See you on the next Windows tips. Not only cndrive32.exe of course.

Adapted from the letter of:
  1. Ahmad Syahruddin (asm2000@yahoo.com)
  2. Motta Gare (mottagare@yahoo.com)