Looking Who Last Accessed a File; Admin Tips


This tip is to monitor who last accessed a file and may be useful for you (Administrator). To be able to do that, you should enable auditing on a file.

To enable auditing, you have to enable auditing at the server level on the Windows security policy and then enable auditing on the particular object (in this case, a file) which you are interested.

Do the following to enable auditing at the server level:
  1. Press Windows Key + R and type "secpol.msc".
  2. In the left pane, expand Local Policy and click on Audit Policy.
  3. In the right pane, double-click Audit object access.
  4. Check the boxes beside Success or Failure (as needed).
  5. Click OK.
And the next step is, you must enable auditing on the target file or folder from "Windows Explorer".
  1. Open Windows Explorer.
  2. Browse to the files or folders you want to audit.
  3. Right-click and select Properties.
  4. Select Security > Advance > Auditing and click the Addbutton.
  5. Enter the user or group you wan to audit access for and click OK.
  6. In the Auditing Entry dialog box, select the type of access you want, click OK when you finish.
  7. Apply.
It’s look pretty to know who last accessed or modified a file or folder you have configured. Give attention when enabling auditing on a frequently accessed set of files or folders. The number of audit messages in the Security event log can grow quickly with just a few accesses of the file. So, think wisdom please.
Click to see detailed picture

Replacing In-Use File; Windows Tips


Have you replace a file but error message appears and says something like the moving can not be continued because the file is in use.

The errors occur when a file that will be replaced is protected by the system.
error-moving, error to replace
Click to see detailed picture

Usually the files are protected by the file system is important (core files). This is very good to protect files from changes that could damage the system performance. But if you feel you have to make a replacement, you can overcome this with some pretty powerful methods. You can try to boot from safe mode, but sometimes there are files that can not replaced even in safe mode.

Do these steps to replace in-use files:
  1. Launch your registry editor: go to Run, type "regedit" on Windows XP or 2003, or "regedit32" on Windows NT or Windows 2000.
  2. Browse to HKEY_LOCAL_MACHINE\SYSTEM\CurrentControlSet\Control\Session Manager.
  3. Right Click on the right-pane, New > Multi-String Value > and give the name as PendingFileRenameOperations.
  4. Double-click our new Multi-String Value (PendingFileRenameOperations) and assign the value data.
  5. The format to assign the value data is as follow:
    • On the first line enter \??\ followed by the path of the new file. Please note, to put the new file on the fix HDD, because the replacement process will be done after the machine is rebooted
    • On the second line enter !\??\ followed by the old file.
      multi string value
      Click to see detailed picture
  6. Click OK to save the changes.
  7. Close the Registry Editor.
The sample file above is not important file which protected by Windows System. If you going to replace the important file (protected by Windows) give extra-caution, whenever replacing files, it may harmful your systems.

OK, that’s all, I hope the tips above are useful for you, see you on the next tips…
Adopted from: techbytes.com

Blocking Auto Update Windows; Windows Tips


Hello, meet you again with thecybergal. On this time I will discuss ways to block the Windows automatic update.

Update your Windows on a regular time basically is a very good thing and this is recommended because for some "security reasons". Of course this is only for them who use original version. If you use cracked Windows, then you should look for Windows activation tool first.

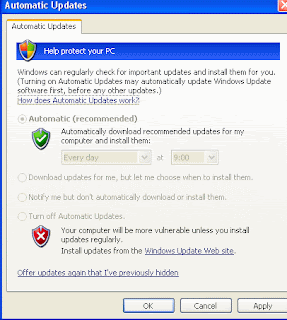
For you who used the cracked Windows and do not want to update the patch because you have confidence in your Anti Virus, then you can disable the Windows automatic update. This can easily be done by logging into the control panel, automatic updates, and select "turn off automatic updates". For some reason, we can’t choose to turn off automatic update (exactly, I didn’t know how can this trouble happens).

Click to see detailed picture

How can we overcome thus problem, is there another way to turn off the automatic update? Yes, of course, we can do it by typing something in the command prompt. Just simply, type "reg add HKU\.DEFAULT\Software\Microsoft\Windows\CurrentVersion\Policies\Explorer /t REG_DWORD /v NoWindowsUpdate /d 1".

So easy, isn’t it? The syntax above is not case sensitive, so you are free to choose large or small letters in writing tips above.
See you next time, there are many tips we will learn together.

Creating A Program Alias, Windows Tips


Alias, we can say as a short name of a command. It enables a replacement of a word with another string.

A program alias is a little different from a shortcut or link. In the UNIX platform, we also know the alias-command whose function is similar to the alias that we will discuss now. Type an alias is easier than writing the complete command in Windows.
Consider the following analogy:
Write down "compmgmt.msc" in Run dialog box is easier than click on the Start menu > Administrative Tools > Computer Management, but typing "cmg" is the easiest way among of them. So, how can we make "cmg" can serve to open the computer management?

Do the following steps:
  1. Create a new sub key under the following key: HKLM\SOFTWARE\Microsoft\Windows\CurrentVersion\App Paths
    The name of the sub key should be alias name. If you do not want to write extensions when using the alias, put .exe at the end of the name. You can give any name, but you must write the "extension" of the alias name if you do not put .exe at the end of the alias name. In this case, we will use cmg.exe as the alias name.
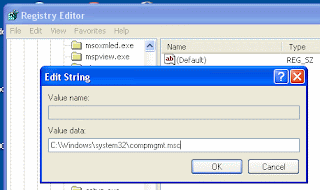
  2. Modify the default value under the new sub key. It shows up with the name (Default) in Registry Editor. Enter the full path to the program you are creating an alias for, which in this example would be C:\Windows\system32\compmgmt.msc.
    Sub key's name for the alias
    Click to see the original size
  3. Test your job by typing "cmg" in the Run Windows.
That’s all the tips today, hope it will be useful for you. See you next time in the other Windows tips.

Adopted from: Windows Server Cookbook, Robbie Allen. Say thank to him

Windows Tips: Make A New Folder


This is a simple trick, but I think this trick can save you time. Without the long-speaking, I will explain the usefulness of this trick.

In this trick we use "mini software" called "NewFolder". Before we learn any further, I would ask how you create a new folder in Windows Explorer. Probably most of you use the Right-Click > New > Folder in the right pane of Windows Explorer. I think it wastes your time.

You can download the software here. Just simply copy it on your fix HDD, double-click and press install. It will add registry entries for the Windows Explorer right click context menu (right pane Windows Explorer). See the screen shot bellow.


So easy and fast isn’t it? Please try it on your computer and give your feedback. That’s all. I think it is a "simple tips" but very useful. See you again in the next tips. Bye...


Adopted from: createwindow.com

Windows Tips: Create Virtual Drive


This is included Windows tips. On this chance I wanna share tips about the "command prompt" in Windows.

These Windows tips may have been heard hackneyed, but what's wrong about sharing something to you :D. These tips tell you about how to create a folder path of a drive to be a separate drives.

Let’s take an example:
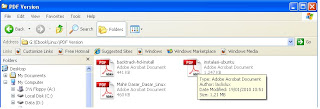
Folder "G:\Ebook\Linux\PDF Version" is a folder that I access frequently. Address path of the last folder (PDF Version) looks so long.
long path address
So I plan to make the long path address to be a short one (H:\).
Look at the both addresses above, drive H:\ absolutely short and easy to type in the command prompt Windows than the first one.
short path address

So how to make it? Follow these steps:
  1. Go to command prompt (Windows Key + R) and type "cmd" without quotes.
  2. According to the example above, we will change the address G:\Ebook\Linux\PDF Version into drive H:\. Just type the syntax, (subst h:\ "g:\ebook\linux\pdf version") without brackets.
  3. Pay attention about the syntax above, that the virtual drive (H:\) is written before the original drive (G:\Ebook\Linux\PDF Version)
  4. Just that, it's easy isn’t it?
A bit guidance about this virtual drive (H:\):
  • The drives are removed after reboot.
  • Whatever you have done will affect the both drives. Something likes a hidden synchronization.
  • Shadow copies are not created.
  • Deleting the virtual drive deletes only the mapping, not the data.
Be careful, it’s quite useful but you have to be a “smart” user.
Okay, see u on the next Windows tips

Windows Tips: SFC Without Installation Disc


One of the many tips in the windows system is SFC.

SFC stands for System File Checker which allows users to scan for and restore corruptions in Windows system files. SFC can be found in Windows 98, Windows 2000, Windows XP, and Windows Server 2003. If you are using Windows Vista, then you can use the Windows Resource Protection as a substitute for SFC.

Since we will restore a "corrupt registry" using the SFC, you are prompted to insert Windows Installer CD in accordance with the system you use. The problem is how if you do not have the Windows Installation CD but you have a Master Installer on your hard disk. Could we run SFC without using the CD, but using the Master Installer on our HDD? If it becomes your problem, try some of these tips bellow:
  1. Copy the i386 folder from Installer Windows CD to drive C: or D: on your PC. Let's just say you put it in drive D:
  2. Change the source file in the registry to "D:\". Look in the following key: HKEY_LOCAL_MACHINE\SOFTWARE\Microsoft\Windows\CurrentVersion\Setup and change the value of SourcePath to D: (customized to your location) and also change the value of ServicePackSourcePath to D: (customized to your location).
  3. HKEY_LOCAL_MACHINE\SOFTWARE\Microsoft\Windows NT\CurrentVersion, change the value of SourcePath to D:\ i386 (the drive adjusted to the location of i386 folder on your PC).
  4. Press WindowsKey + R, and type "sfc /scannow" (without quotes) and click OK.
  5. That’s all, if you have difficulty, re-view the steps above carefully.
So, if there are some corruptions in your "Windows system" file, do not think to reinstall especially reformat your hard disk. But, identify the main problem first and try several methods related to your problem.
I hope the "tips" repairing windows above useful to you, see you next time.
Thanks to ErEll4’s Blog at http://asmssl0812.blog.friendster.com